
Python has quickly gained traction as a competitor and companion to R in the world of data analysis. As such, being able to use this immensely versatile language is quickly becoming an essential skill in epidemiology work. Here, we’ll take the first steps on your Python journey by going through how to download Python, as well as a suite of tools including an Integrated Development Environment, PyCharm.
How To Download and Install Python
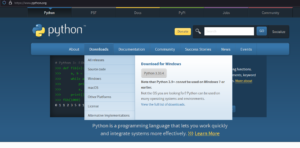 To get started on our journey with Python, first, you must download it from the official source, which is conveniently called python.org. Once you are on the home page, head over to the downloads tab, and select the page for your specific OS. On the OS page, you should select the “Latest Python 3 Release” if you have a more modern OS, or otherwise select Python 3.7.13 if you have any PC with anything more recent than Windows XP.
The reason we are selecting Python 3 instead of Python 2 is that Python 2 is being sunset for most uses, and has some fundamental differences between itself and 3, which seems like it will continue onward as the standard Python version for some time.

After selecting the version you wish to download, simply scroll down to the “Files” section of the release, and select your preferred method of installation. For most, the Windows or macOS installers will be useful, and for Linux users, the tarball will probably work best. In any case, select your install method, wait for the download to complete, and then open the file. From that point, an installation should take place that may need permissions and should complete itself in a matter of seconds.
As a last check, be sure to go to your computer Search bar and type “py”. You should see the Python version you’ve downloaded as an option, and open it. The screen should look similar enough to a normal command prompt. Go ahead and close it out for now, as we discuss for a moment why you might need an IDE as opposed to just developing code for python using that environment.
Do I need a Python IDE like PyCharm?
In short, yes. Could you run through most analyses of datasets using only the command line? Probably, yes. But using an IDE has very many benefits, such as making it easy to save and debug your work, sharing that work with colleagues, and some even making writing code much faster. One such IDE is PyCharm by JetBrains. PyCharm includes such functionality as code completion, optimization, and simple corrections as well, which makes development quite a bit quicker than it would be otherwise. For this tutorial, we’ll be installing PyCharm through Anaconda, which is a free suite of different tools that can be useful throughout a project or analysis life-cycle. Let’s take a look at how to get you started.
How to install Anaconda and PyCharm
 To download Anaconda, simply go to anaconda.com, and at the home page, either hit download or select the icon of your OS and then select your installer. Due to there being so many tools packaged within Anaconda, it can be quite a sizable download of around half a gigabyte.
Once it’s downloaded, an installation wizard will appear on opening. Agree to the terms, then select your destination folder. I would suggest keeping this on your local drive (usually the C: Drive) and creating its own folder. From there, select any advanced options you wish and hit install. After a few moments, you should be able to hit next again and encounter an offer to view the Anaconda Individual Edition Tutorial and Getting Started with Anaconda, which you can view if you so wish. From there you can hit the finish button and you’re all set.
Going forward in these tutorials, we will be using a tool within Anaconda that’s made by JetBrains called PyCharm. It’s a lovely IDE that is very feature-rich and even has fairly informative error handling which can help you spot errors and fix them quickly, which is usually a daunting task with any level of analysis. To open PyCharm, open Anaconda and wait for it to load for a moment. From there, select “Launch” under PyCharm, and you should be all set.
How do I get started with PyCharm?
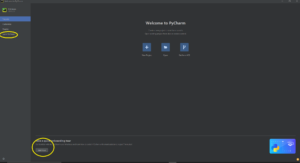 Upon opening PyCharm for the first time, you might be a little lost on how to get started, and that’s alright. Luckily, the PyCharm team has made some excellent tutorials on their IDE and made them immediately available to you upon opening. While it might be tempting to dive right in and click New Project, instead give the onboarding tour a quick go, and then once you’ve completed that, play around in the Learn PyCharm tab. Both of these steps will help build an understanding of the IDE you’re working with and will make learning Python much faster as you won’t have to juggle learning the tools and the language at the same time.
Once you have the tutorials completed, it’s a good idea to set up some folders to put your eventual python files and projects so that your computer doesn’t become a mess of such files. Also, structuring where you’ll be putting things will help you in the future if you wish to use something like Github for sharing and improving your code.
Summary
In this article, we’ve quickly covered how to download one of the most versatile programming languages around, Python. We also quickly covered how to download Anaconda, a suite of data analysis tools and IDEs, and how to get started with PyCharm, which will be used in future articles. Our next articles will cover the basics, including variable creation, data importation, and Exploratory Data Analysis in both Python and R.