
Welcome to the inaugural post of the Broadly Epi Blog, where we will be covering how to do various analyses in R and Python! Before we can begin any real journey into how to use R for data analysis, we first need to ensure that you have R installed, and an IDE, or Integrated Development Environment. To these ends, we’re going to tackle a quick walk-through of how to download and install R and RStudio, as well as some customization tips for the latter. For those of you wanting to learn Python, a sister post should be up shortly. Going forward, every effort will be made to create paired posts, examining how to solve the same problems in both R and Python.
How To Download and Install R
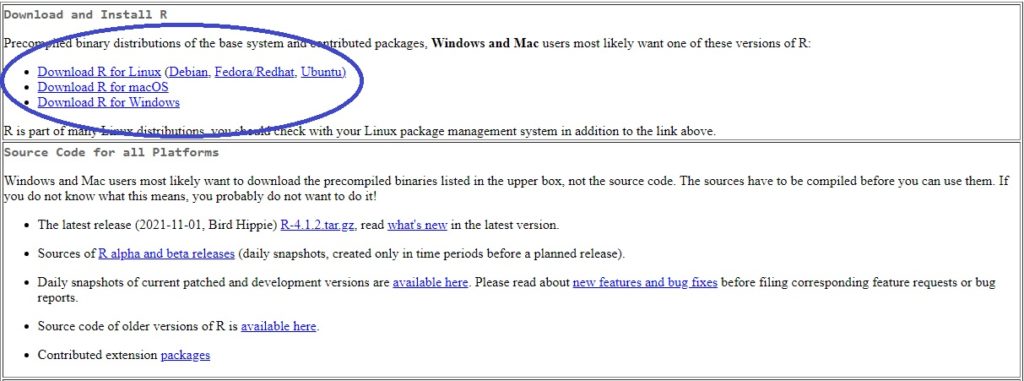 To download R, the first thing you’ll need to do is to pop over to the Comprehensive R Archive Network, or CRAN for short. You can either search for CRAN manually if you like, or click here to be directed right to where you need to be. From the homepage, simply click on the download link appropriate for whatever OS you’re running.
Next, click on the “base” sub-directory. Also, once everything is up and running with R and RStudio, you’ll want to return to this page and click on the RTools option to download it, as it will be useful for packages, which will be discussed in a later blog post.
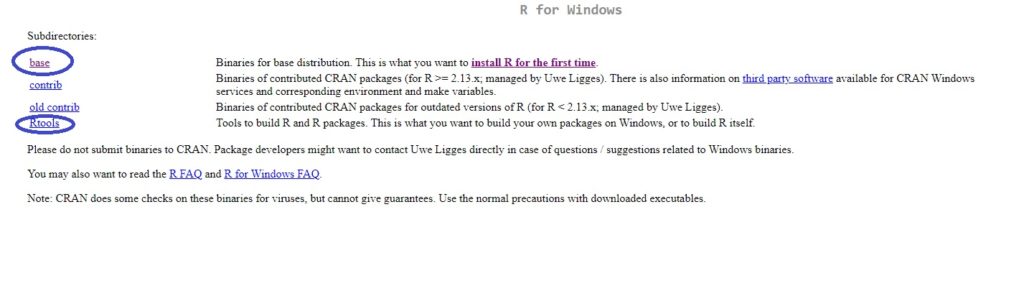 Once you have selected your desired OS and clicked on the “base” subdirectory, now you just have to click the “Download R 4.1.x for Windows/MacOS/Linux” and wait a few moments for the file to download (at time of writing it’s 86 megabytes in size). Once downloaded, open up the executable file (which should be published by Ooms) and allow changes. From there, it’s as easy going through the install wizard and making sure things are saved to your local drive (usually your C: drive). The reason for this is that if you work in any sort of VPN environment with virtual drives, it can take some serious time to perform operations and run code (think hours instead of seconds).
Do I really need an R IDE like RStudio?
In short, no. Many developers in fact despise RStudio with a burning passion (and in truth, sometimes I do too) so they work off the command line, a simple text editor like Notepad++, or even use other IDEs that were originally built for other programming languages.
A bit of a spoiler but many IDEs, including RStudio, support cross-language scripting! This means that for certain projects, say those that need to use SQL, Python and R, can all be developed in one IDE so there aren’t a bunch of them just cluttering your desktop.
Now as for why I’m going forward with RStudio, it’s quite simple. I’m assuming that anyone reading this could have any amount of R experience, and I find RStudio to be a fairly good starting point for people who plan to use R as part of a greater suite of tools. This is due to the fact that RStudio is approachable, and any “bad habits” picked up from its use can be left behind when the time comes.
Now, as to why we’re using an IDE in the first place, that’s a much easier answer. First, it gives us a program that can help organize, test, and plan out future programming projects. Second, an IDE is basically universal in terms of writing code, whether it’s R, Python, Java or nearly anything else. Lastly, if you plan on working in data science or public health, you’re going to be expected to have some experience with tools like IDEs and maybe even notebooks (which will be addressed later).
How to install RStudio
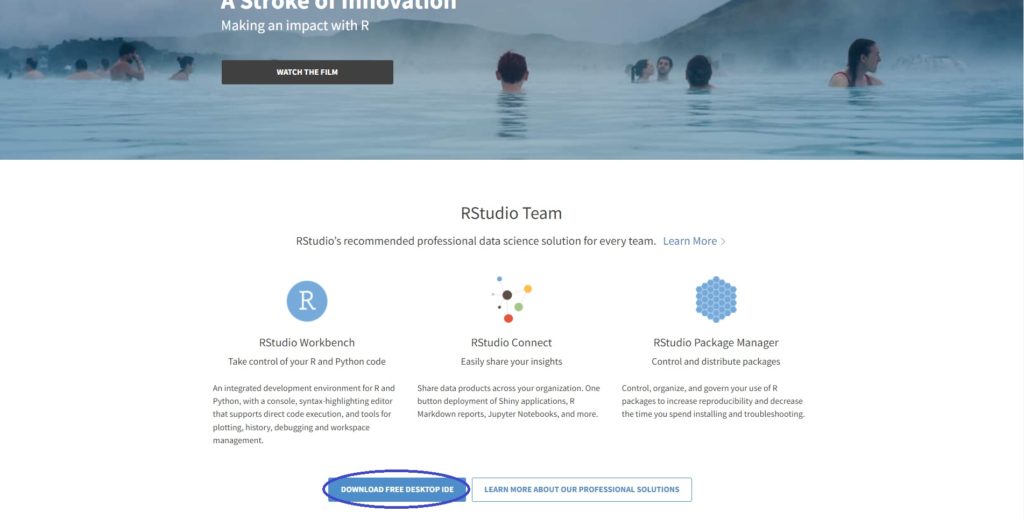 Installing RStudio is about as simple a process as one could hope for. First, head over to RStudio and click “download free desktop IDE”. From there, I advise “RStudio Desktop” to start out with, click on the download button, and then select what OS you’re working with, and a .exe, .dmg, or .rpm will download depending on your OS option. Then it’s simple as open the file, run through a quick navigation wizard, making sure you’re installing on the C: drive if possible, and opening up RStudio for the first time. Let’s take a look at how to now customize RStudio a bit, and you’ll be all set for the upcoming series of analysis tutorials.
How can I configure RStudio?
As with any IDE, there’s a few features out the box that are not configured ideally. First and foremost is the color scheme of the IDE. White background, black text? Not exactly what most people are looking for. Black background with a rainbow of different colors to determine if something is a variable, function, or anything else? Now you’re hacking the planet, or at least looking the part.
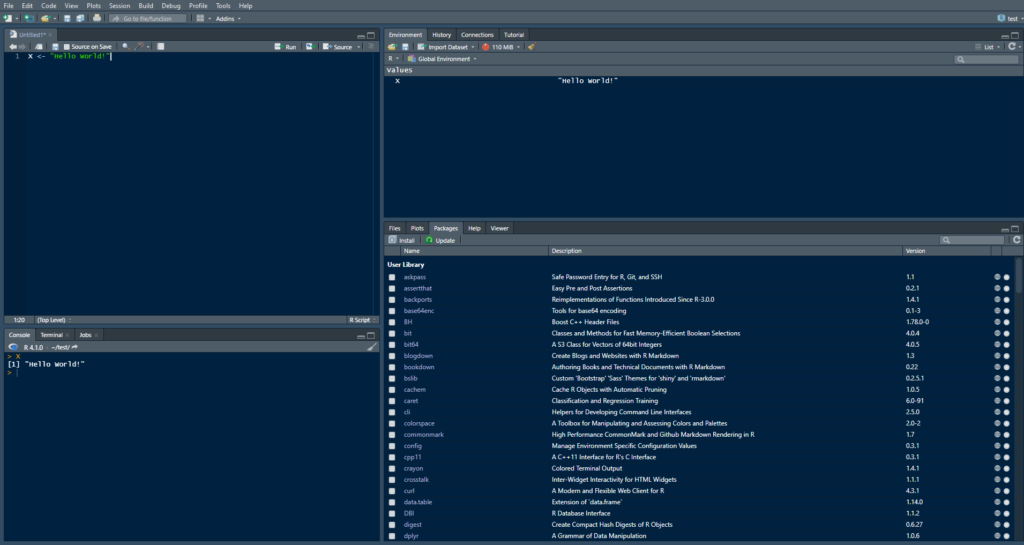 To adjust how your RStudio looks, simply go to Tools > Global Options, then select Appearance. From there, have a blast finding out which palette pleases you most. You should also pop down to the Pane Layout and see what fits best. For me, I find having the script window in the top left corner, the console/terminal in the bottom left, the environment in the upper right, and the plots, viewer, and help documentation on the bottom right. That said, do whatever feels right to you, but in future articles it might be worth keeping in mind my specific set up so things don’t get too confusing if I’m giving screenshots alongside GitHub code snippets. For the uninitiated, the script window is used for being able to write, save, and repeat code on demand as well as some other fancy things we’ll get into later, the console is for trying out code you’re likely to only run once, and the environment tab shows what variables you currently have loaded into your current workspace.
Summary
In this very quick lesson, we got you acquainted with how to install R and RStudio. From this point on, we’re going to start using R and RStudio to perform various analyses, build visuals to help examine problems, and later on even create our own Machine Learning models to do some incredible prediction or categorization work. It may sound like a lot to tackle, but ultimately learning such topics will make seemingly insurmountable tasks a question of adapting some code and hitting run.